Ooh my, just when I was feeling guiltier and guiltier for harboring ongoing predilections for PIC microcontrollers even though there was no decent linux/OSS toolchain, it seems Microchip have come to their senses and released a cross platform IDE.
I came across this while checking out the newly released dsPIC based arduino shield and arduino IDE compatible chipKIT Uno32.
http://new.eetimes.com/electronics-products/processors/4215826/Microchip-uses-NetBeans-for-IDE-to-support-for-Linux--Mac-OS-and-Windows
http://eecatalog.com/8bit/2011/05/17/microchip-unveils-open-source-integrated-development-environment-with-cross-platform-support-for-linux-mac-os-and-windows-users-2/
Joy of joys. This was one of the few remaining reasons to have a windows partition....
I reckon the dsPICs have awesome potential for SDR applications, such as beaconing/WSPR/QRSS. Hmmm, I really should finish off my SDR cube now and then play with the code a bit.
Friday, 27 May 2011
Finishing the signal tracer
Like a lot of amateur radio operators, I have quite a few partly finished projects lying around, usually at the point of being a working circuit board, but not boxed up and labeled.
Waiting for the amoxycillin and clavulanic acid to kick in for the head cold, and waiting for the batteries and hardware for the roller shutter mods to arrive, I avoided the urge to start a new project, and thought I'd actually finish one for a change.
I bought a signal injector and tracer kit from oatley electronics a while back.
http://secure.oatleyelectronics.com//product_info.php?cPath=100_110&products_id=255
It is very similar/essentially the same as the published silicon chip design:
http://www.siliconchip.com.au/cms/A_30488/article.html
A 555 putting out an audio signal at a few KHz is made to sweep up and down in frequency by another 555 which is doing the frequency modulation, and this becomes the signal for injection into your cable with many harmonics.
The tracer has some front end amplification with the 2N5484 followed by a transistor stage which achieves some detection as well.
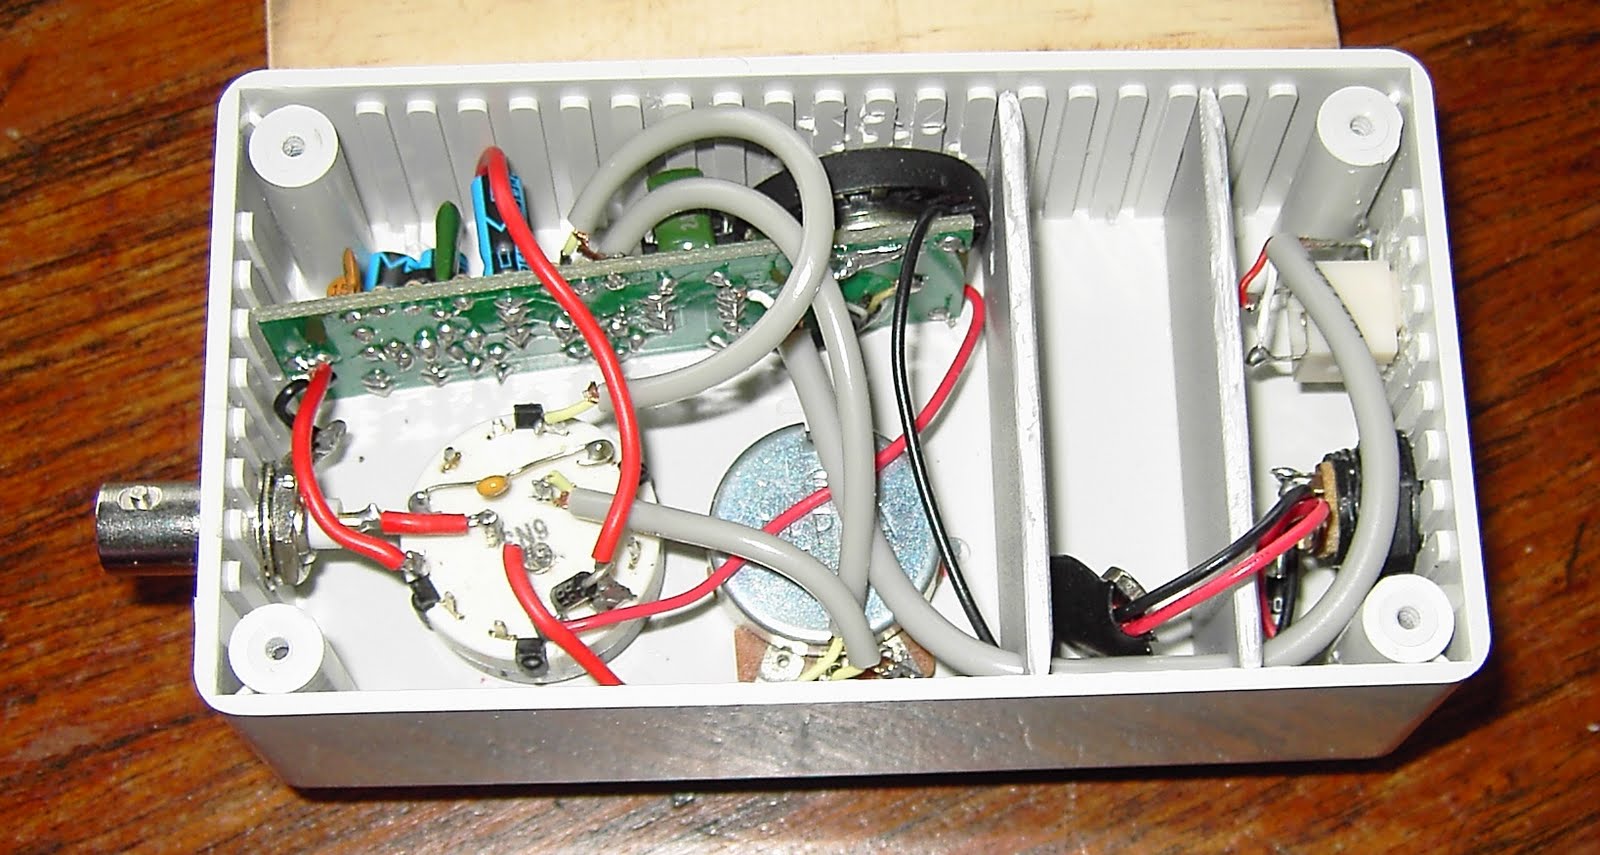
I thought why not add a simple audio tracer function and complicate things by adding a 3 pole 3 position switch to take care of power, AF and RF input routing, and LM386 input routing, and add a potentiometer for AF gain.
The LM386 input is hi-jacked for the AF signal tracing, and the RF input stage is only powered up when the input BNC is routing the signal through the RF front end.
So, the kit gets to do double duty as an RF signal tracer and an AF signal tracer.
The photo shows the innards of the tracer, with the signal routing and power routing on the rotary switch.

The dividers making up the 9V battery compartment were made with tin snips and some spare ABS panel from a lexmark printer found in a dumpster. I prefer to use an external power supply for gear that is not used frequently, and added the switched DC barrel connector socket, as well as an external 8 ohm audio jack.
All done. I won't lose the screws for the lid now that the lid can be left on permanently.
 I've now made it a habit to label the power connector so I don't have to dig up the specs a year later when I've forgotten what it needs for power.
Waiting for the amoxycillin and clavulanic acid to kick in for the head cold, and waiting for the batteries and hardware for the roller shutter mods to arrive, I avoided the urge to start a new project, and thought I'd actually finish one for a change.
I bought a signal injector and tracer kit from oatley electronics a while back.
http://secure.oatleyelectronics.com//product_info.php?cPath=100_110&products_id=255
It is very similar/essentially the same as the published silicon chip design:
http://www.siliconchip.com.au/cms/A_30488/article.html
A 555 putting out an audio signal at a few KHz is made to sweep up and down in frequency by another 555 which is doing the frequency modulation, and this becomes the signal for injection into your cable with many harmonics.
The tracer has some front end amplification with the 2N5484 followed by a transistor stage which achieves some detection as well.
I thought why not add a simple audio tracer function and complicate things by adding a 3 pole 3 position switch to take care of power, AF and RF input routing, and LM386 input routing, and add a potentiometer for AF gain.
The LM386 input is hi-jacked for the AF signal tracing, and the RF input stage is only powered up when the input BNC is routing the signal through the RF front end.
So, the kit gets to do double duty as an RF signal tracer and an AF signal tracer.
The photo shows the innards of the tracer, with the signal routing and power routing on the rotary switch.
The dividers making up the 9V battery compartment were made with tin snips and some spare ABS panel from a lexmark printer found in a dumpster. I prefer to use an external power supply for gear that is not used frequently, and added the switched DC barrel connector socket, as well as an external 8 ohm audio jack.
All done. I won't lose the screws for the lid now that the lid can be left on permanently.

Saturday, 21 May 2011
The roller shutter controller
Here are some photos of the roller shutter controllers.
A torx security screwdriver and you're off and away.
Note the 12 x AA x 1.2V NiMH battery pack.
The battery pack is a nominal 14.4V 1500mAH

These battery packs get very hot when charging....
This might explain why so many have died....
I rang the factory, which is local, but they never
called back about replacement battery packs.
Oh well, that has motivated all this. Hopefully this will
help others confronting this problem, like VK5FDGW.
The unregulated 28V DC wall charger did not impress
me either.
I have seen replacement battery packs on e-bay for
about AUD$80
I have seen AA 1.2V NiMH tagged cells for AUD$4 in
quantity, which are 2000mAH.
So, I could buy a new battery pack, for AUD$80, and
wait for it to die again...
Or, I could make a battery pack, not a simple thing,
as it has to shoe horn back into the controller and I'd
need to solder or spot weld 11 pairs of tags, and it
would cost at least AUD$48 for the AA cells, and then
having done this, wait for it to die again.
Five dead controller battery packs starts to add up to
real money.
So, the next step was to try the trusty bench power supply.

The shutters are fairly large, up to 5 m^2 per roller shutter, which
was the maximum allowed at the time we bought them.
I removed the battery pack, and attached the leads to the socket
pins which the battery pack attaches to. The battery leads are
red and black, which should be observed when attaching an
external power supply.
As the roller shutter starts to go up, it seems in excess of 2.5A are
drawn at roughly 14V DC.
The controller refuses to work if the input voltage is in excess of
19V or so.
The next step was to try an SLA battery, plugged into the controller.
The following battery is a 1.3AH 12V battery which sells for
AUD$18 in quantity.

The battery is being topped up here, after playing with the roller
shutters. It needs needs no more than 130mA to top it up, for
constant voltage charging.
The battery is adequate for lifting and lowering the roller shutters.
The roller shutters only need 1.5A or less, when being lowered.
So, five AUD$18 batteries is sounding much more reasonable.
I suspect I could replace the controllers with simple switches
to move the shutters up and down, but I reckon a simple fly
lead to the nearby (currently) blank wall plate for power will
allow me to hide the battery in the wall further down. There is
a spare cat5 cable behind the blank wall plate which will be
used to float charge the battery daily.
SLA charging is easy, and I will knock up a current limited
fixed voltage charging circuit next, delivering about 130mA.
This should keep the batteries happy and healthy for many
years, and should be more reliable than the NiMH batteries.
The roller shutters are available with AC powered controllers
but we are in a bushfire area and want them to work when
AC power is not available. Also, we are on off grid solar and
don't want phantom loads overnight.
Some inspection of the circuit board revealed some power
conditioning for the unregulated charger input, dropping it to
about 15V with a switched mode circuit, which charges the
onboard battery via a diode at around 160mA.
After this diode is the common 15V bus.
The 15V then moves on to a high efficiency switched mode
power supply chip LP2951 which steps it down to around 5V
for the ATMEGA48.
There is space on the circuit board and some antenna
trackwork for 433MHz receiver bits and pieces for the
remotely actuated version which is sold.
There is also the driver circuitry for the roller shutter
motors, and some current sensing for the roller shutter
current, and some test points.


One down side of using an external SLA battery is that
the controller decides that the battery needs charging, and
it seems the ATMEGA48 has some kind of logic for starting
and completing charging, however broken. The effect of
this is an infrequent, regular flash of a red LED, visible from
the front of the controller.
Feeling too lazy to reverse engineer the ATMEGA firmware,
I plan to cut the single track going to the red LED. Ignorance
will be bliss.
The other thing to do will be splicing in some wiring that will
also go down the fly lead which will allow the controller to be told
to open or shut the roller shutter remotely, via the spare cat5
cable conductors. There will be plenty of space in the controller
without a battery pack if another microcontroller is needed.
Then, just add a web interface and an android phone....
Hmm, I wonder how the warranty will be affected....
First Post
Well, I needed somewhere to put my random hacks and
musings.
So, here it is.
Coming soon... how to use cheap SLA batteries with
OZroll (TM) roller shutter controllers... instead of the
expensive NiMH battery packs which die so easily....
This will probably be a theme of this blog.... fixing stuff
the manufacturer should have done right the first time,
keeping stuff out of landfill, hacking stuff together with
stuff found on the side of the road, using appropriate
technology, and pondering how best to apply the
the laws of thermodynamics to subversive ends ....
To quote Sheldon Cooper:
the physics is theoretical, but the fun is real.....
Subscribe to:
Posts (Atom)